Lawn Moles and Voles
How to Get Rid of Them
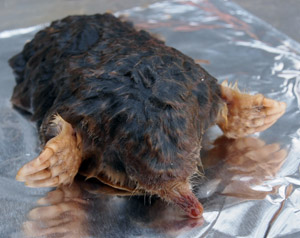
Lawn moles can be one of the most frustrating problems a homeowner can deal with. While one or two short tunnels are hardly noticed, multiple tunnels crisscrossing your lawn is too much. You're probably thinking, "surely there must be a sure-fire way of getting rid of lawn moles, isn’t there?"
The photo shows a mole the cats dragged up. Literally! This is a front view of a mole showing its snout and the large front digging claws. Cats are often a mole's biggest enemy.
Important: This page is mostly about lawn moles. Click here for detailed information on Voles.
Have you ever wondered why there are so many mole "cures"? Its simply because most methods don't work or they are set in the wrong place. This fact alone has opened the doors for all sorts of strange ideas. If you searched the internet, you have probably read some of them.
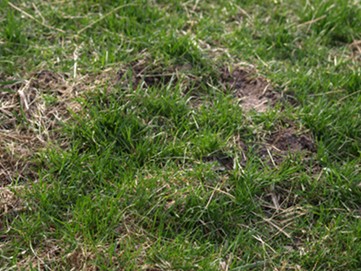
All is not lost, you can do this. To successfully get rid of lawn moles does require some skill, but mostly it is knowledge of mole behavior that is essential. The photo above is of a short, winding feeding tunnel.
The Difference Between Moles and Voles
Ground moles and voles are quite different in looks and behavior. Here is a quick view of these differences.
A quick description of moles
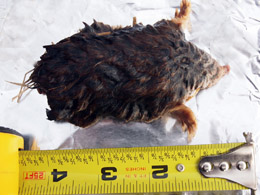
- Moles are not rodents, but are strictly insectivores.
- A mole’s diet is primarily earthworms, but will eat grubs and other insects.
- Moles can dig up to 15 feet per hour.
- Moles have short front legs with over-sized front claws for digging.
- Moles are generally 4 to 9 inches long. Photo shows a 5 inch long mole.
- Mole are solitary and territorial animals.
- Females usually give birth once a year.
A quick description of voles
- Voles are rodents and are primarily herbivores causing extensive damage to small trees and plants and bulbs.
- Voles are largely a winter problem.
- Voles will often use abandoned tunnels left behind by moles.
- Voles can breed many times a year.
- Voles are roughly a third larger than a field mouse, but are no longer than 6 inches.
Mole Behavior
People are often asking the question, "What do moles eat"? Moles are strictly insectivores with a diet consisting primary of earthworms. However, they will also eat insects including grub worms. Tunneling is hard work and will eat their body weight in worms each day. Moles are highly territorial and solitary animals. A single mole can do a lot of damage.
A common misconception with moles is that they are primarily seeking grubs. Therefore, it is reported that the cure is to apply a pesticide labeled for grub worms, thereby eliminating their food. However, since earthworms are their main food source, killing grubs will not necessarily fix the problem. If fact, it could actually increase mole activity.
How could it make it worse, you ask? It depends a lot on the pesticide you use. Some pesticides will not only kill insects and grubs, but earthworms as well. With the decrease in available food, there is often a sharp increase in tunneling in frantic attempt to find more food. By the time the mole gives up and leaves, it has already wrecked your lawn.
Making Sense of the Tunnels
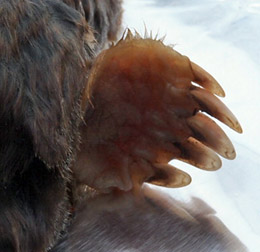
Moles live their lives below ground and will rarely travel on the surface. The tunnels they dig are more organized than they appear. Some are well below ground and you will never see them. The long straight tunnels can be likened to an underground highway that moles use to move between locations.
The Photo shows the over-sized digging claws that easily grind through soil. Clearly, these animals were born to dig.
The nest may be located a considerable distance from the feeding grounds and the long tunnels are how it gets around. Other moles passing through to a neighboring feeding ground may also use some tunnels.
The feeding tunnels are much shorter with multiple twists and turns. The short, sharp, twists and turns are made as the animal searches for food. The holes coming up to the surface are created to push out excess dirt. They have little function other than that. During the winter when the earthworms go deeper, so do the moles. They will follow their food supply.
Moles may make one tunnel and then seem to disappear and at other times will tunnel extensively. A mole generally won’t stay longer than a few weeks in one area. However, after he is gone, a different mole could move in and occupy the same area. A possible reason for its disappearance could be due to a neighborhood cat or other animal. Most likely, however, it is still around, but in a different location.
Vole Behavior
Voles are different from moles in that they are herbivores. They are small, stout rodents slightly larger than a field mouse. They are brown to gray in color, 4 to 6 inches long, with large front teeth used for chewing through bark and roots. Moles do not have these large front teeth. Voles can be very destructive and can damage roots of plants and trees.
Voles are primarily a problem in the cooler months and during the winter. They don’t like the hot soil surface that accompanies the summer months.
Voles are low on the food chain and so have a high reproduction rate. For short periods, voles can often be seen on or near the surface where their numbers are kept in check by local cats, owls, coyotes and foxes. In residential areas with a shortage of cats, there may be fewer other predators to keep their numbers down, so it is often up to the homeowner to do that.
Voles will often damage grass roots, flower bulbs, garden flowers and landscape trees. If you have mulch around the trees, make sure the mulch is not piled against the base. Voles will tunnel through the mulch and attack the tree leaving wounds for pathogens and damaging insects to enter. A properly mulched tree should have a few inches of space between the mulch and the base of the tree so the root flare can be seen.
Home Remedies and Commercial Products
In an attempt to drive these pests away, many home remedies have surfaced. The success rate of most of these products will vary greatly. Most home remedies were created out of desperation and do not actually work at all.
Some home remedies include placing objects in the tunnel such as chewing gum, mothballs, red pepper, cat hair, human hair, etc. Chewing gum is supposed to clog their intestines after it is eaten, thus killing the animal. The others are various types of repellents. There is no evidence that any of these work.
Most people don’t realize that lawn moles will not stay in one location for longer than a week or two before moving on. (That doesn’t prevent another mole from coming into the area after one leaves, however.) Since these animals live underground, it is difficult to prove their disappearance was not a result of anything the homeowner tried. This is one reason why the home remedies have been around for so long.
The exception is in trapping. With trapping, you have a mole body to prove the lawn mole is actually dead. However, while trapping works, it takes skill and the animals will avoid an ill-placed and obvious trap.
Stomping Tunnels
Stomping down the long straight tunnels that lawn moles use for traveling back and forth is believed to irritate the animals and may cause them to leave for a time. However, if the food is good there, it may not work. Lawn moles live to dig and can easily reclaim damaged tunnels or dig new ones. Stomping the short feeding tunnels will do no good since they are only used to scout for food. Most are abandoned shortly after digging.
Flooding Tunnels
Flooding tunnels can work if you are lucky enough to trap them between the water and a surface hole. Tunnels can be quite extensive allowing several avenues of escape. It also depends on the type of soil you have. Sandy soil can absorb the water as quickly as you put it in. Clay soils will work much better.
Vibration and Noise Devices
High pitched vibration devices are advertised to drive away lawn moles. Its effect is often short lived as moles get accustomed to the noise, but a few claim it works. Like any other device designed to scare away birds or animals, it is only a matter of time before it is no longer effective.
Professional Baits
Professional poison baits have been developed to look like the lawn moles primary food source. In fact, they look and feel exactly like an artificial plastic worms used for fishing. I know of several professionals who have used this method, but again skill is the key. I will explain more about this method below. The major drawback is the cost. Expect to pay as much as $60.00 for a box of twenty worms.
Mole Traps
Lawn mole traps are believed by some to be the only sure method of ridding your lawn of these animals. Most professional lawn mole catchers use traps. Why? In the right hands, they are very effective. With mole traps, you use no poison and the traps can be reused.
Trapping Tips and Secrets
Lawn moles and voles are difficult to get rid of. Commonly, when one animal leaves or is caught, another arrives to take its place. Others are more fortunate. After catching one or two, the problem seems to go away. Complete lawn mole extermination may not be possible, especially if other people around you are also experiencing a mole problem. But, it always pays to try.
Importance of Finding the Active Tunnels
The first thing you must do is to find a primary tunnel the animals are actively using. Look for the longer, raised tunnels that may possibly be used to travel from the nest to the feeding grounds, etc. Do not worry too much about the short, windy tunnels. They are most like feeding tunnels and are not used often.
Methods of Locating the Active Tunnels
First method: Use your heel to crush a small section of raised tunnel. It shouldn’t be more than a few inches wide. Mark the spot with a landscape flag or by placing a rock in the grass next to the spot you crushed. Do this on different tunnels that look promising spaced no closer than ten feet apart. Do not crush the whole tunnel or it may dig a new one. If it is an active tunnel, the area will be repaired within 12 to 48 hours.
Second method: Carefully make a small hole in the top of the raised tunnel the size of a quarter or slightly larger. Mark the area beside it with a landscape flag. Lawn moles do not like any light coming in and will seal the hole. If it is an inactive tunnel, it will be left alone.
Trap the tunnels that were repaired.
Do not set the traps at the end of a tunnel. It should be in the center of a long tunnel or close to where another active tunnel breaks off. The number of traps set depends on the amount of active tunnels you have. Three or four traps is okay for an average sized lawn with a lot of tunnels.
There are a number of lawn mole traps on the market. All claim to be the best and probably all have a measure of success. However, certain ones seem to be used more often in the professional industry. Popular traps come in different variations and price ranges. Two popular models are the "harpoon trap" and the "scissor trap".
How to Set Mole Traps

Setting a Harpoon Trap
If using a harpoon, also called a spear trap, setting it is easy. Simply compress the spring and set the trigger. Care should be taken to keep your fingers away from the spears in case the trap should accidentally release.
Note: Follow the directions below when placing the trap and not the directions that come with the trap. The box directions are poorly written. You must make an indentation in the top of the tunnel for the trap to be effective and the box does not include that information.
Placing the Harpoon Trap
Placing the trap is easy. The first thing you do is to make an indentation in the center of the tunnel with your finger. You want to slightly depress the roof of the tunnel, but do not cave it in or make a hole. The purpose is to make a dent in the tunnel roof, so that the mole will attempt to fix it by pushing it back up.
Next, center the trap over the tunnel exactly where you made the dent. Push the two spikes into the ground on either side of the tunnel. Do not push the spikes into the opening of the tunnel, but straddling it on either side. The trigger release should rest on the soil surface in the center of the dent.
When the lawn mole pushes up on the dent to fix the tunnel, it will hit the trigger, releasing the spikes. Quite often the mole is not stuck in the spikes when the harpoon trap is retrieved. The way the trap is built, the lawn mole can easily get away, but is often mortally wounded. Frequently, the animal can be found within a few feet of the trap.
Of the different traps this is probably the easiest one to use. It doesn't require digging into the tunnel. However, the spring can be a little hard to pull and load. The top of the trap has a T hook that is included as a pull handle to help load the trap. It is always better to load a few traps as insurance should one fail and so you are not spending days or weeks trying to catch the mole.
Setting a Scissor Trap
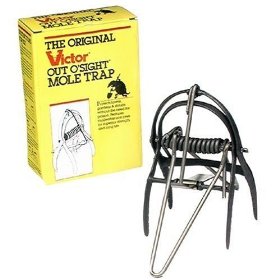
The spring mechanism in scissor traps is strong. Many traps come with a device to help compress the spring for easier setting. Be sure to use it.
Make sure your fingers are away from the scissor should the trap accidentally spring. Once the spring is compressed, set the trigger plate. Most of these traps are quite rugged and sturdily built. Don’t hesitate to use pliers to adjust the scissor or the trigger plate should it need it. (It often does.)
Placing the trap
Using a garden spade, carefully remove the top of the tunnel. Make sure the tunnel is clear of any excess dirt that may have dropped in the hole. The next step is important: Place a small rock, piece of wood or mound of dirt in the bottom of the tunnel directly under the trigger plate when you place the trap. This obstacle you placed in the bottom of the tunnel will be something the mole will want to remove and increase the chances of setting off the trap. Carefully place the trap in the tunnel and cover with dirt up to the spring. Do not fill in the tunnel when covering with dirt.
Some people will place a large bucket over the trap. If you do this, make sure it will not allow in any light. It needs to be totally dark under the bucket. Place a large rock on the bucket if necessary. This also will keep dogs from setting it off.
Check the traps every few days. If you haven’t trapped any moles, set it in a different location.
Remember, most trapping failures are due to improper trap placement. The trap must be placed in a tunnel the mole or vole is actively using.
Killing Moles Using Poison Baits
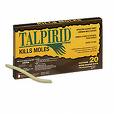
The development of poison baits that resemble the mole's food have become quite popular. Many professional are now using these in addition to traps. The price is the biggest problem with these products. Talpirid is the name of a product used by many professionals, but comes with a price tag of around $60.00 a box. Homeowners can also purchase and use Talpirid.
Other manufacturers, such as Tomcat, offer a similar product for less than half that price.
Read the directions carefully before using. Gloves should be worn when handling the bait.
Placing the Baits
Follow the same methods listed above for finding an active tunnel. After finding the active tunnels, make a small quarter sized hole in the top of the tunnel and drop a worm into it. Make sure the worm is completely in the tunnel and then cover the hole with dirt. You find it easier to place a small rock over the hole first, then cover the rock with dirt to block out all light from entering the tunnel.
It helps to mark the drop location with a landscape flag, rock or stick. After a couple of days you can check to see if the worm has been eaten. I have used a lot of these baits and found worms to be completely missing or partially eaten.
Good Luck! Please write to me and tell me if you are having success or if you have found a better way of killing moles. We can share your results with other readers.
Controlling Voles in your Lawn
Voles are similar in some ways to lawn moles except the voles primary diet are plants. They eat roots, bark, flowers and any vegetation at ground level and are very destructive. Find out how to control these damaging pests.
All About Lawn Grubs
There are several species of grubs that can damage turf. Click here for detailed descriptions of their life cycles, the damage they cause and how to control them.
Red Imported Fire Ants
These dangerous ants are found throughout the southern U.S. and will fiercely defend their nests whenever it is disturbed. To the unwary person, dozens of painful stings can occur within seconds. Learn valuable information about these insects and the methods used to control them.
Bald Faced Hornet Facts and Removal
Bald faced hornets, distinguished by their large round or oval nests, have a fierce reputation. They will defend their nest with multiple stings. Learn tips for safely removing a nest without getting stung.
Getting Rid of Fleas from Lawn and House
Although fleas are not a danger to your lawn, they can be extremely frustrating to your pets and family. Infestations can occur when fleas are out of control or when control methods are inadequate. Click here for complete information for getting rid of fleas.
Lawn Moss and How to Control ItLawn moss is a common problem in yards. However, its presence represents deeper soil problems that must be fixed or the moss will stick around. Find out what must be done to finally end your moss problems.
Dog Urine Damage on LawnsWe all love our pets, but dog urine can do a number on grass. There is hope. Find out what can be done to save your lawn and your pet too.
Lawn Moles back to Lawn Care Academy Home
