Complete Tree Planting Instructions
- The No Regrets Tree Guide -

Thanks for viewing our tree planting guide. These simple tree planting instructions may save you a lot of grief later. Here is what I mean.
There is a real sense of satisfaction that comes with creating a beautiful yard. While the hardest part about planting a tree may be digging the hole, it is certainly not the only thing you need to consider. Many trees fail to thrive or their life is shortened due to how and where it was planted.
Your First Helpful Tip - You should always research your tree first before purchasing. Just a little knowledge may save a lot of headaches down the road.
What You Should Look at Before Buying a Tree
- How tall will it get
- How close to the house are you gong to plant the tree
- How broad is the canopy when full grown
- Do the roots often grow above the ground
- Does the tree put out sucker stems (stems that grow from the roots and can become new trees)
- Is it an extremely heavy shade producing canopy
- Will it attract stinging insects
Here's why. Trees look so innocent when they are small. Planted next to the house may add just the right touch. All trees start off small, but some don't stay that way.
My dentist had to have several trees removed that outgrew the space they were planted in. This happens more than you know. This section will help you avoid these and other common mistakes.
A word of advice. Don't trust a landscaper to do it right because a lot of the trees that are removed were planted by landscaping companies. Who knows what they were thinking.
Carefully Choose the Best Planting Site
One of the best tree planting instructions you can receive is this: Choose your site carefully. It is hard to move a tree once you realize it is no longer working out.
A Lesson From Real Life
Tree location is very important and one that is often overlooked. My home's previous owner planted two apple trees eight feet from my house. In addition, he didn't follow good fruit tree pruning instructions.
The trees are now about 20 feet tall and 20 feet wide and loaded with apples. Our patio and glass door is right next to the tree. Apples drop on the edge of the roof, patio, and into the gutters. The apples attract bees, wasps (that feed on insects), and animals. In the summer, every time we open the door a wasp or bee comes into the house.
I will probably be pruning the old apple tree this winter. Tree planting instructions encouraging good planting location is always priceless in hindsight.
This is a small check list that will help you determine the best location. Six important things to consider before planting:
6 Important Tree Planting Instructions

- How large will the tree grow? Where is its proximity to the house?
- Will it produce messy fruit that will stain sidewalks and driveways?
- Hickory trees, sweet gums, oaks, and similar trees drop hard fruit (nuts, pecans, acorns, seed pods, etc.) that can be hard to clean up. Be sure you are okay with it first.
- Did you chose a location with ample sunlight so the tree will grow properly? For example, is your location on the shady side of the house, but the tree requires full sun?
- If planted in an area with limited root space, can your tree selection handle root space restrictions? Other trees are known for shallow rooting that can damage sidewalks or foundations.
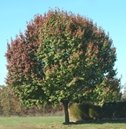
- Is the tree prone to limb breakage or major structural damage. For example, Bradford pears often suffer major limb and truck damage in winds. They will often completely break apart within 20 years due to the natural formation of weakly attached limbs.
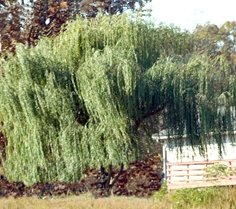
The photo shows a weeping willow tree that has almost outgrown the front yard and is not through growing yet.
The bottom line: choose your planting location carefully. This will be one of your most important tree planting instructions. Oak trees can grow to massive size and most make excellent shade trees. But planting too close to the house may be asking for trouble. A single limb of some oaks can be larger and heavier than many trees by themselves.
On the other hand, willow trees do not have massive branches, but can quickly reach enormous size. Many willow trees have been removed within a few years after planting because they have grown too large.
The Hard Work - Digging the Hole
Tree Planting Instructions Step 2: Digging the hole.
Once you have selected the spot to plant your tree, you will need to dig the hole. Here are a few basic rules:
- Avoid the common mistake of planting the tree too deeply. Planting too deeply can cause the tree to decline and shorten the life of your tree. In most cases, the top of the root ball should be at grass level. Planting trees too deeply is one of the most common mistakes people make.
- Dig the hole twice the diameter of the root ball, so the roots have ample room to spread.
- If you have poor quality soil, be sure to mix some compost in with the backfill to improve the soil and to give the roots more nutrients.
Tree Planting Instructions to Prevent Girdling Roots
Girdling roots is a funny name, but it can kill a tree. The name refers to roots of plants grown in a container, including young trees purchased at nurseries. Since the roots have no where to go they will start growing in a circular pattern against the inside container wall.
After the tree has been planted and has grown for several years those circular roots begin to choke (girdle) the trunk of the tree. Over time the tree can decline to some degree or can even die.

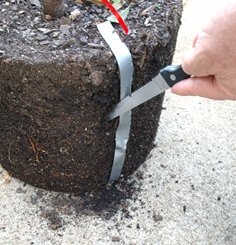
Here is a simple fix to prevent girdling: After removing the plant from the container, cut four or more vertical lines in the root ball from top to bottom in equal spaces. The grooves can be ½ to 1 inch deep from one to five gallon containers. The cuts can be deeper when grown in large containers of 10 gallons or more.
The photo shows a piece of tape on the root ball that marks how it should be cut. Make sure you cut it in at least four different places to break the circle.
If you can see a lot of roots on the bottom of the root ball, you should cut one or two grooves across the bottom as well. An X shape works well.
Tree Planting Instructions for Balled and Burlaped Trees
"Balled and burlaped" refers to nursery trees that were grown in the field and then cut from the ground using specialized equipment.
After the tree is removed from the ground, the root ball is prepped and wrapped in burlap, then tied or wired closed around the trunk. Some nurseries use a wire basket instead of burlap. Balled and burlaped trees do not have problems with girdling roots because they were grown in a field. In addition the roots are cut when the tree was removed from the ground.
To plant the tree, dig a hole twice the diameter of the root ball. Make sure the hole depth is equal to the height of the root ball or slightly less. The top of the root ball represents the soil height and the tree should not be placed deeper than that.
Place the tree in the hole and position the tree how you want it. Cut the wires or string holding the burlap to the trunk. It is important to brush away any extra dirt that may be been pushed against the trunk when it was wrapped. Most of the tree roots grow in the top foot of soil, so cut away the burlap from around the ball below the one foot mark to expose the top foot of soil. If the burlap has been treated it will be necessary to remove as much burlap as possible even to the bottom of the ball. The nursery should tell you if the burlap is treated or not.
Backfill the hole with the dirt you removed when digging the hole. It is okay to amend the soil with compost, aged manure, quality topsoil, or similar materials. This will also supply additional slow release nutrients.
If your tree has a wire basket instead of burlap, after the tree is in the ground, remove the wire all the way to the bottom of the ball. Follow the steps above to fill the hole.
Don't forget to remove the wire around the trunk of the tree that held the burlap closed. One person called me to investigate why their 6' dogwood was slowly dying. She said it looked great the first few years. There were few leaves on the tree, maybe a dozen. No disease problems, etc. So I dug around the roots to find the wire was never removed and it was cutting into the tree. The landscape company replaced the tree.
Tree Planting Instructions for Planting in Heavy Clay Soil
Clay is great if you are making pottery, but a pain if your are trying to grow plants. While too much clay makes for poor soil, some clay is needed. Clay is one of the best sources to capture and hold water as well as nutrients.
Clay has good and bad qualities as seen below:
- Clay soil has excellent water holding capabilities. It has a high Cation Exchange Capacity (CEC).
- Clay also tends to drain more slowly. Holes dug in heavy clay can act like a bowl that holds water and can drown the roots.
- Clay soil can become very compacted. Compaction compresses the pores together, so less water and air is able to enter the soil. A tree can suffocate and also suffer from lack of water even if rainfall was plentiful. This is a problem because trees and most plants get their water and oxygen from the roots.
My Parent's Story with Gumbo Clay
My parents live in South East Texas and have gumbo clay soil. They are surrounded by forest, but the majority of trees they have planted are not thriving. A soil test showed 65% clay and low pH. There was also a considerable amount of sand being so close to the gulf.
Several things can be done to fix the problem. Adjusting soil pH is easy. It is done by spreading lime over the lawn. Lime has to work into the soil to be effective. To speed the process around the tree, be sure to thoroughly mix some lime with the backfill. Refill the hole with the mixture of soil, compost, and lime to the proper height. My parents would need to water the trees thoroughly once a week or more during hot dry weather.
Tree Planting Instructions for Backfilling the Hole
When backfilling a hole dug in heavy clay soil, use a good portion of the clay removed from the hole as backfill. Mix the clay with quality topsoil, compost, or similar organic material. If you use mostly compost or potting mix as the backfill, the roots may stay in the soft material and not penetrate the harder clay on the outside of the hole. By using the clay as part of the backfill the roots have a better chance of continuing beyond the planting hole.
Note: Be sure you are digging in clay and not hardpan. It is usually easy to tell the difference. Hardpan is a layer of almost impenetrable, rock-hard clay. You can dig through it, but it will be much harder and the clumps do not break up easily or soften when wet. Hardpan forms a barrier where water flows over the top. It occurs where tiny particles of sand or other material has filtered down and has collected in the pores of the clay resulting in cement like material. It can occur several inches to several feel below the topsoil. It may not be present everywhere where there is clay. As stated, hardpan is a barrier that neither water nor tree roots will penetrate.
Fertilizing Newly Planted Trees - Yes or No?
Tree planting instructions have changed a lot over the years. Applying fertilizer is one of them.
The modern approach is to hold off on fertilizer when planting a tree. It is not necessary to add fertilizer for the first year after planting. Transplanting is hard on a tree. There is an initial shock and the trees absorb few nutrients while recovering.
Is it wrong to add any material at all to a newly planted tree? No. But be careful what you add. By adding compost to the soil, mycorrhiza fungi, and similar material is okay and is great for the tree. It feeds the beneficial microbes and help break down elements in the soil so they are available to plants. More about this is explained below.
Yes, I know what you are thinking. Won’t the trees need the nutrients? What about tree fertilizer? Trees respond slowly to change including transplanting. If you added any compost to the backfill, the soil microorganisms will break it down and release enough nutrients. However, if you have a slow release organic fertilizer, you can add that.
You can also add mychorrhizal fungi. This is an essential and naturally occurring beneficial fungi that collects on the roots and assists the roots in absorbing water and nutrients. Mychorrhizal fungi can be purchased at may garden stores and added to the soil. The fungi can actually act as a root extension reaching water and minerals beyond the tree roots natural reach. This extension can be as much as several feet in all directions. Turf Formula greatly increases Mychorrhiza naturally. You can find this on our website.
Plant vitamins, humic acid, or other materials that help to relieve stress can also be used.
Three Things After the Tree is Planted
Do I Trim the Canopy After Planting?
Trimming the canopy way a common procedure in some of the older tree planting instructions. The idea was to make the canopy size more equal to root ball size. Now it is recommended that you do not prune the canopy when planting the tree.
This is because the tree will need the leaves for carbohydrate production through photosynthesis, which is needed for root growth. However, it is fine to cut out dead or diseased branches at any time of year. Wait at least a year before you begin pruning live branches.
Staking the Tree
This is one of the most important "post tree planting instructions". The decision is an easy one: You can stake the tree if it needs it.
Is the tree exposed to wind? Is the root ball small and shallow? You may need to stake the tree.
There are many materials designed for trees. T-posts are cheap and easy to drive into the ground. Wood posts are sometimes used, but harder to drive into the soil.
To tie the tree use a soft material. You can use wire, but do not use bare wire on the tree or it will damage it. It is popular to cut foot long sections of an old garden hose and run the wire through the hose. You can also purchase suitable material at a garden store.
Watering the tree
Following good tree planting instructions will get your tree off to a great start. Remember, until the roots begin to reach out into the surrounding soil, the only water your tree will get will be what you give it or when it rains. If the tree is dormant when you plant it, it will not need as much as when it is growing, but it will still need some.
Always follow good tree planting instructions whether you are planting apple tree or planting a dogwood tree. (A hint for dogwoods, it is an acid-loving plant, so add peat moss in the planting hole).
Thanks for viewing our tree Planting instructions. We hope it has been a good resource for you before you begin planting trees.
Plant Growth Regulators
Plant growth regulators are generally used to slow the growth of the above ground portion of the tree. It is not recommended when first planting. However, if the tree roots of more mature trees are damaged and the canopy is full, then using a PGR is beneficial. When the canopy is slowed in growth, the tree will redirect the energy to the roots, developing and growing thicker roots.
Other types of PGR can be used to stop seed production on trees that produce annoying fruit or seed pods. The timing is critical and knowledge of when to apply is essential for success.
Pictorial Guide to Pruning Trees
Pruning trees just got easier. Click on our pictorial guide that shows how to correct structure problems of upright growing trees, how to prune young shade trees, fruit trees, and some small upright trees.
Tree Depth Planting Guide
Planting your tree at the improper depth is one of the most common mistakes we all make. Planting too deeply kills thousands of trees every year. Review this pictorial guide to know why and how to plant at the correct depth.
Tree Planting Instructions back to Total Tree Care
Introduction to Lawn Care Academy's Tree Care Page offering links to our specific pages as well as tips on tree care.
Tree Planting Instructions back to Lawn Care Academy Home


